Dioramas for spatial computing: creating progressive immersive spaces
From Apple’s system-wide progressive views of mountain lakes and snow-covered Yosemite to Disney and Max’s movie-themed 3D experiences for watching their videos, 360-degree dioramas in Apple Vision Pro can create focus and set a mood. This post shows how to add these experiences to any app.
If you are not interested in the code but are interested in the concept, I suggest you watch the video and then jump to the section “More information and inspiration” at the end.
Boilerplate code
The approach here does not reflect any recommendations from Apple. It is just what I have found works. It is inspired by the tradition of creating dioramas for museums.
To use a diorama, it is easiest to start a new project with a progressive view (Xcode creates the boilerplate code), but a progressive view can easily be added to an existing application.
Here is how to start a new project with a progressive view:

Creating a new project with a progressive view
In the example above, the Initial Scene is “Window” (1), the Immersive Space Renders is “RealityKit” (2), and the Immersive Space is “Progressive” (3).
The boilerplate code that Xcode creates includes an ImmersiveSpace (see below). It is in the ImmersiveView that we create the diorama.
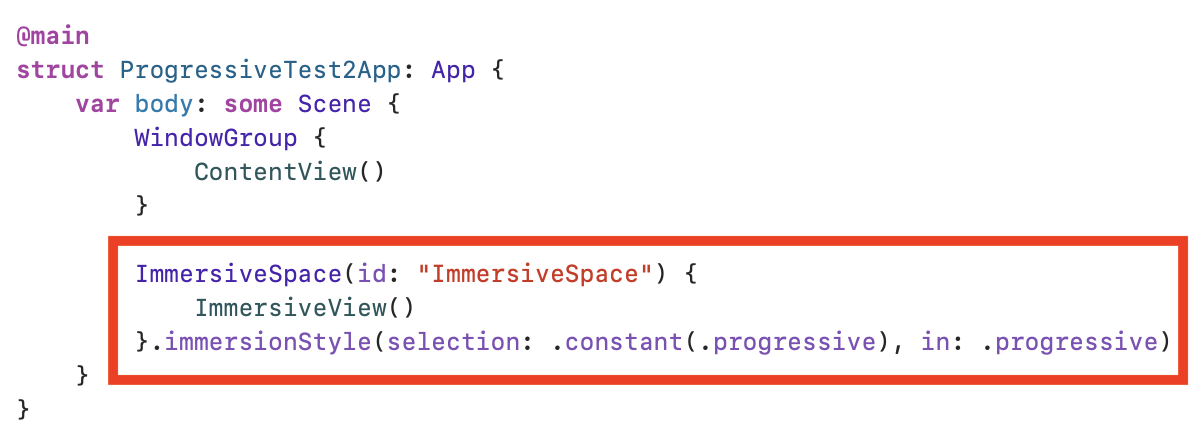
ImmersiveSpace boilerplate
In the initial window’s ContentView created by Xcode, there is a button to toggle the progressive view on and off. In my example code in the video above, I use a traditional toggle switch to turn the progressive view on and off.
When the progressive view is on, the windows for all other applications are hidden, and the headset’s dial can change the level of immersion - that is, how much of the diorama is shown vs. how much of your room is shown.
Creating the diorama in the ImmersiveView
A traditional diorama generally consists of nearby 3D content and a painted wall to represent the distant content.
Following this pattern, the ImmersiveView shown below loads two main pieces of content: the 3D model representing nearby content (e.g., a room or land speeder) (1), and distant content that is actually a 360-degree image drawn onto a large sphere surrounding us (2).

Loading the diorama
In part 1 in the example above, “VR_room1” is a USDZ model I’ve added to the project. This is the nearby content. In this case, it was a model I purchased from Sketchfab.
In part 2 in the example above, “BlueNebula” is the name of an image set containing the 360-degree image. The 360-degree image I used for BlueNebula was an image I downloaded from Adobe’s stock images. That image is added as the material to a sphere surrounding us.
Below is a screenshot showing how I added the image set to the Xcode project. I selected “Assets.xcassets” (1), clicked ‘+’ (2), in the menu that opened, selected “Image Set” (3), renamed it “BlueNebula” (4), and then dragged the image to one of the image wells (5). Note: I rescaled the original image from Adobe to 6000 x 3000 pixels.

Creating the image set for the background
And that is it!
You are good to go.
Suggested improvements
The example above was very simple, and there is definitely room for improvement. Here are a couple of suggestions.
1) For the nearby content, I would recommend a more open area than an enclosed room. This would allow the user to move the windows further away. I just used a model I had previously purchased.
2) Integrate the nearby model with the distant image. I created a sphere with a radius of 1,000 meters and painted the stars onto that. A fancier implementation could use a smaller sphere (perhaps 10-30 meter radius), have the 3D content go right up to the edge of the sphere, and integrate the 3D model with the image painted onto the sphere. This could probably be done in a 3D content creation tool like Blender.
More information and inspiration
For more information on creating traditional dioramas, see the article Gallery: The art and science of museum dioramas, and the related TED Talk “Dioramas: Part Art, Part Science”
I can imagine, and I hope, that an entire cottage industry of creating dioramas springs up. Professors could make this a class project for their 3D computer modeling classes. Artists could create dioramas and post them for sale on sites like Sketchfab. Application developers could contract artists to create custom dioramas that fit the theme of their applications. Natural history museums could create immersive dioramas for their collections.
So many possibilities!